Saturday, March 31, 2012

Shrug Design, day 3

Ok, so here is my sketch of the shrug that I will design/knit:

I'm going to cast on at one cuff, knit all the way across, then seam up the sleeves. I've already started knitting, I'll post pictures tomorrow.


Remember the Bunny Mail Project? Well it's finally March 31st, and I selected three winners as promised. They have all been emailed, so hopefully I will get to mail these off soon.

Friday, March 30, 2012

Shrug Design continues

After poking around on the internet for a bit I found some shrugs/boleros that are sort of the look that I'm going for. Obviously neither of these are knit, and I want mine to end just above the elbow, but these are the general idea I'm going for. 
I have also swatched some stitches and washed my swatch. (In order to make sure your knit items fit you must ALWAYS wash your swatch. Materials grow considerably after washing)

From the bottom up I have swatched a 2x2 rib, a slipped/reverse stockinette lace, and stockinette. I asked the Thursday evening knitting group last night whether they preferred the lace or the stockinette, and the overwhelming majority was for the lace. 
Next Step: sketch, math (my least favorite part) and cast on (the best part). 

Thursday, March 29, 2012

New Design

I thought I would blog about my design process for a shrug that I'm knitting for the Yarn Tree Studio in Raleigh, NC. While talking to the owner Lynn today she mentioned that they have a new yarn in the shop, and needed a pattern and shop sample to highlight the yarn. I listed a few ideas, and she liked one of them, and so I'm designing a shrug for this yarn. Of course I'll also make the pattern available on Ravelry. The yarn is Cotton Supreme Sequins by Universal Yarn Inc. It's 97% cotton, 3% polyester, 3.5 oz a skein and 197 yards. I'm going to try to design a shrug for two skeins, but we'll see...

Here's a picture of the yarn, it's a lovely green color, and there aren't too many sequins.

Now I'm going to swatch and draw a sketch. More on that tomorrow!

Saturday, March 24, 2012

Cologne - H&H

As I mentioned in the last post this week I am in Cologne for H&H. I forgot to bring my camera, so I've had to take pictures with my iPhone, and it's hard to tell on the screen if things are in focus. Anyways, here are a few pictures from this. We've been very busy, so I haven't had much time to explore the city, but here is one of the huge cathedral that is nearby our hotel. 
 I saw this while we were setting up, one of the stands has a giant knit button! There are many other interesting displays, I'll try to take a few pictures of them tomorrow before the show is over.
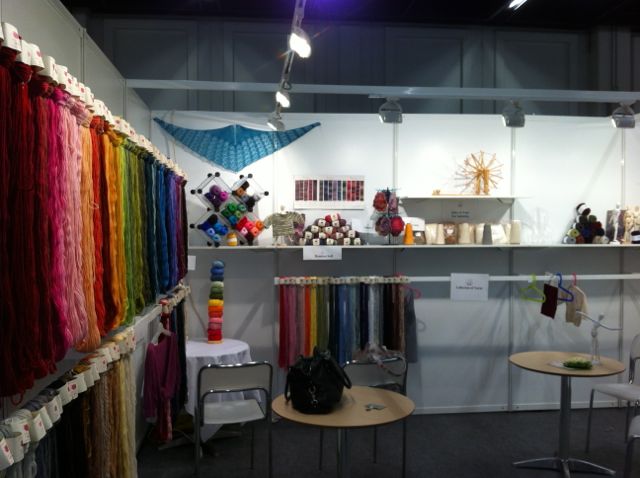
 Here are pictures of the Lotus Yarns stand. On the left is a rainbow of the pure cashmere which is very soft and luxurious. On the back wall on the far left is the Autumn Wind, a cotton cashmere, and below the shawl is the Moon Night, which is a lambswool and cashmere lace yarn. Handing on the rack at the back is the Bamboo Soft.
 Here's another picture of our stand.

Thursday, March 22, 2012

Germany!

Dear Blog,
I haven't forgotten about you, I've just been busy this week. This week I'm in Cologne for H&H, the hobby and handicraft trade show. I'm here with Lotus Yarns, helping them to man their stand. I'll try to post some pictures soon. I haven't bought any yarn...yet!

Saturday, March 17, 2012

Another new pattern!

Part of why I have been able to publish so many patterns so quickly is because I wrote some of these patterns some time ago.

Today I'm publishing the Bamboo Baby Dress pattern, available in 3 sizes 18", 19", and 20" chest. I was originally given this variegated bamboo yarn by Lotus to design a women's top. It turned out absolutely hideous. I was about halfway through a top, with a keyhole opening on the back, and the yarn was pooling, and the fit was weird, and I absolutely hated it. Then I was talking to some people from my Beijing SnB group and about making a baby dress, and Mei gave me the idea for the big yoke, and this dress was born. I finally had the dress test knit, and now the pattern is ready for the public! I hope you'll enjoy it!

Thursday, March 15, 2012

Yarn!

I went to Yarn Tree Studios today in Raleigh and they were having 50% off on some of their yarns. I couldn't help myself. I have a healthy stash already, but with that big of a sale, who can say no?

So here's what I bought:
Wolle's Color Changing Cotton
I've never knit a shawl from cotton before, but I was curious to try it with these long color changes.
  Manos Serena 3 ply baby alpaca/pima cotton
Apparently I was in the mood for green today

The Yarn Tree has also agreed to start selling some of my patterns in their shop! The Miya Shawl will be first, so they gave me a skein of the beautiful Malabrigo sock in purple to knit a shop sample. This picture isn't that good, it's hard to photograph dark purple with my point and shoot camera. 

Wednesday, March 14, 2012

Short Rows Tutorial Part 6: How to use short rows to make your sweaters fit

I don't know why I remember this, but I do. In sixth grade we had a substitute teacher for a week who would make students who came to class late say "better late than never, better yet never late".

Anyways, here's the rest of the short-rows tutorial.

I learned how to do short rows when I first began knitting socks. Here are some other ways to insert short rows to make your knit garments fit better.

You can add short rows to the lower back of your sweater to keep it from riding up. This is especially helpful to wear with low rise jeans if you don't want to flash your lower back.

 You can put short rows in the bust area of your sweater in addition to the waste shaping. This is helpful if you are...well endowed. Waist shaping will add width to the bust area, but by adding short rows you also add length, so that the sweater will drape better over the bust area. 
This is the same idea as above, but on a cardigan. Here you will one set of short rows on one side, then do the other side, whereas above you would do paired short rows on both sides simultaneously. 

You can see the rest of this series here: 
Short Rows Tutorial Part 2: Wrap and Turn
Short Rows Tutorial Part 3: Yarn Over Short Rows
Short Rows Tutorial Part 4: Make One Short Rows
Short Rows Tutorial Part 5: Japanese Short Rows

Tuesday, March 13, 2012

Anime Infinity

I know I promised that I would finish the short rows tutorial this week with info about how to use short rows. It's coming, I promise. Part of why it's been delayed a bit is because I've been getting new patterns ready to be published!

This pattern is for the Anime Infinity Scarf. This scarf was inspired by the yarn, Anime by ArtFibers, which I received from Brian for Christmas. I received two skeins, and I knit a lacy baktus with the first skein, but then I felt the need to design something special for this beautiful yarn.

These are more amazing photos by Katy Doyle featuring the lovely Rebecca Song.


Right now this pattern is available for free exclusively to my email subscribers. So if you'd like to have this pattern, just sign up for my mailing list below. As soon as you confirm your email address you'll receive a link to the PDF.


UPDATE

This pattern is now available for free download through Ravelry here. Or for direct download here. Of course you are still welcome to sign up for the email list if you would like.

Sunday, March 11, 2012

Falling Leaves Scarf & Shawl is here!

I'm really excited to say that the Falling Leaves Scarf and Shawl is finally up and ready for sale! Here are some pictures of the scarf by Katy Doyle, and that's her in the first picture. 


Friday, March 9, 2012

Short Rows Tutorial Part 5: Japanese Short Rows

Today I will be showing you step-by-step how to do Japanese Short Rows. I think these are the most seamless and best looking on the right side, but they do show on the wrong side. They are also more tedious than any of the other methods and if you're doing a lot of short rows it's a lot of safety pins. 


In this example I will be working 3 sets of paired short rows (to create a curve in the middle) on a swatch that is 30 stitches wide, and each wrap and turn will be two stitches from the end, then two stitches from the previous wrap and turn.


Here you can see the right side. The wraps are practically invisible. 


And here is the wrong side, where you can clearly see the wraps. 

Want more short rows? 


Thursday, March 8, 2012

Short Rows Tutorial Part 4: Make One Short Rows

Today I'm posting a step-by-step tutorial for make one short rows. Personally, these are my least favorite. I think that the 'wrapped' stitch becomes warped and there are small holes left where the stitch is picked up. 


In this example I will be working 3 sets of paired short rows (to create a curve in the middle) on a swatch that is 30 stitches wide, and each wrap and turn will be two stitches from the end, then two stitches from the previous wrap and turn.


Here I've marked where the short row turns occur. You can see that there are small gaps from the M1s. 


Want more short rows? 


Wednesday, March 7, 2012

Short Rows Tutorial Part 3: Yarn Over Short Rows

We're on Day 3 of short rows! 
Today I'll be covering how to do yarn over short rows. These seem less fiddly to me than the wrap and turn, but not quite as tidy. You can try them and tell me what you think. 


In this example I will be working 3 sets of paired short rows (to create a curve in the middle) on a swatch that is 30 stitches wide, and each wrap and turn will be two stitches from the end, then two stitches from the previous wrap and turn.


Want more short rows? 


Tuesday, March 6, 2012

Short Rows Tutorial Part 2: Wrap and Turn Short Rows

Today I'm going to be showing you how to do the classic wrap and turn short rows. These short rows are easy to employ and don't leave any holes in your knitting. They are not as invisible as other ways to wrap and turn, but are easy to work.

In this example I will be working 3 sets of paired short rows (to create a curve in the middle) on a swatch that is 30 stitches wide, and each wrap and turn will be two stitches from the end, then two stitches from the previous wrap and turn.

 Below you'll see the 6 wrapped stitches after being knit with the wraps.
Tomorrow I'll be posting step-by-step instructions for the yarn over short rows.


Want more short rows? 


Monday, March 5, 2012

Short Rows Tutorial Part 1: What are short rows?

I've decided that this week I'm going to be focusing on short rows. Every day I'm going to post about this wonderful technique. I'll start today by explaining what short rows are and how they work. Later this week I'll continue with posts about how to do different short row techniques including: the wrap and turn short row, the yarn over short row, the make one short row, and the Japanese short row. Then next week I plan on talking about different ways to use short rows. I hope you'll all find this information helpful and interesting.

What are short rows?

Short rows are incomplete rows of knitting, where instead of working every row on the needle you knit back and forth on just some of the stitches.  In the picture you can see below that I knit a swatch, and the pink yarn is where I worked the short rows. The arrows show how I first worked to before the last 3 stitches, then turned the work and purled back to before the last three stitches. I continued to do this two more times, and then I knit across all of the stitches again.

In the picture below you can see that at each turning point the number of pink rows increases by two stitches.

Tomorrow I'll be posting step-by-step instruction on the wrap and turn short row technique. 


Want more short rows?